


| << Back |  |
Pastimes: What’s Trending Now…
By DeDee Birdsall
Ottomans have been around as long as man has sat upright, but this long-time staple has taken on a whole new life. With a little ingenuity and a small amount of effort, you can transform your favorite footrest into extra seating, storage, or simply a trendy accent piece. And best of all, you can create them yourself using a wide variety of easy to find materials and objects. Ottoman designs are all over the internet, and a quick Google search will get you started. Add a bit of imagination and a dash of creativity, and you’ll have your own homemade ottoman in no time!
Ottoman Styles
The style and types of ottomans vary as much as any other type of furniture, both in artistic design and intended use, but we’ll be focusing on two specific types for this article:
As the name suggests, comfort ottomans are designed with the intention of being used as foot stools or small places to sit down. This style of ottoman is typically covered with fabrics that range from cotton to tufted leather and is most commonly rectangular, square or round shaped.
Truly the most multi-purpose of all ottomans, storage ottomans are designed for seating, foot rests, and storage and often include a hinged lid for easy access to the storage compartment. These work great for small rooms where storage is at a premium and closets are already full.
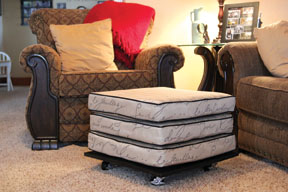
DIY Box Cushion Makeover – Comfort Ottoman
This DIY option requires a few basic design skills, but it’s easy to create and can be completed by purchasing and covering cushions or using existing couch cushions. A versatile ottoman, you can roll it anywhere you need it or lock it into place to create a stationary piece of furniture.
Supplies You’ll Need:
- Two to three couch cushions or purchased box cushions
- Decorator fabric to cover the cushions
- Plywood cut to the size of the cushions (for the base)
- Spray paint in your color choice and finish
- Four casters (available in a variety of sizes)
- Power drill
- Velcro circles
Here’s How:
Choose two or three cushions. Measure the cushions and cut fabric accordingly. Sew cushion covers and place cushions inside the covers. Have a piece of wood cut to the size of your cushion at your local lumber store. Our example used 22 x 22 inch cushions, so we chose a ¾ inch birch plywood in a 2 foot x 2 foot size and had it cut to 22 x 22. Paint the wood base and let it dry.
Drill four holes in the wood, each approximately two inches in from each corner. Screw the casters into the holes. Flip over so the casters are on the floor and stack the cushions on top of the wood platform. For best results, use a non-slippery fabric on the cushions, such as canvas. Silkier fabrics tend to slip, which isn’t conducive to relaxation. For a quick stop on falling or sliding cushions, add a piece of Velcro (round Velcro patches) to each corner of all cushions.
The Moroccan Pouf – Comfort Ottoman
Morocco is known for amazing furnishings made from handmade fabrics and textiles. The “pouf” is one such specialty: a round, stuffed ottoman usually constructed of metallic leathers or ornamental embroidered fabrics. Unlike other types of ottomans, they have soft edges and offer great comfort, perfect for a little rough play in a kid’s room or extra seating in the living room. Poufs can add color and design to any room, but have a little more structure than the old school bean bags of the 1970s. True Moroccan poufs can be quite expensive, but you can create your own for as little as $50.00.
Here’s How:
Visit http://www.bhg.com/decorating/do-it-yourself/accents/make-a-pretty-pouf/#page=2, where you can find a pattern, a list of supplies you’ll need and step by step instructions. For best results, use a heavy decorator fabric. Old clothes, worn towels or fabric scraps can be recycled as stuffing, putting old linens to use. We stuffed ours with old canvas drop cloths and towels, and used fiber fill and foam to create the smooth outside surface. Rolled bath towels layered around the bottom and sides of the pouf add strength, stability and structure to the finished product.
For a slightly different look, you can try this step by step process for making a square pouf: http://www.apartmenttherapy.com/how-to-make-a-modern-beanbag-p-113771
Another pouf can be made from repurposing a recycled, oversized sweater, as found here: http://www.cabin-fervor.com/2011/12/diy-sweater-pouf.html
The Stowaway – Storage Ottoman
Both pretty and practical, the stowaway ottoman was popular in the 1950s and was often covered in textured vinyl and perched within a black metal frame with a handy dandy storage compartment. Stowaways are still popular today as double duty furniture. If you manage to score an original 1950s version as we did, you can reupholster it in trendy fabric to add a splash of retro to your décor. Using an old trunk or container lets you create a focal point for your room with no sewing! A staple gun, upholstery padding, and decorator fabric will do the trick.
Supplies You’ll Need:
- Storage item such as a trunk or an actual storage ottoman in need of a facelift
- Three to four-inch upholstery foam and fabric (enough to cover the foam pad)
- Decorator fabric
- Staple gun and staples
- Sewing machine (optional)
Here’s How
If you’re using a storage ottoman in need of a facelift, remove the hardware, top and existing fabric. Save the existing or original fabric to use as a pattern for your new fabric. Cut new fabric using your pattern. Sew the new cover using the old one as your guide. Stretch the new stitched cover, holding it taut as you staple the fabric in place on the top and bottom of the ottoman.
When using a trunk, no sewing is required. Measure and cut the upholstery foam to fit the top; a three inch seat base is best. Keep upholstery padding in place by covering the foam with the upholstery fabric and wrapping over the foam. Staple this to the base to assure no slippage when stapling your decorator fabric. Cut decorator fabric to fit the top of the ottoman, leaving at least three inches on all sides. Hold upholstery fabric taut as you staple. Trim any excess fabric.
Ottomans are more than just a place to prop up your feet. They can be fun and stylish additions to any home, adding color and flair to your living space. Best of all, you don’t have to be an expert seamstress to put them together from scratch and create a delightful new brand of décor.


