


Warm and Cozy Hand Knitting – the Latest Trend in Fiber Art

Warm and Cozy
Hand Knitting – the Latest Trend in Fiber Art
By DeDee Birdsall
We’re fast approaching the winter months, and we all know it’s the best season for us crafty people. We love to hunker down, have a couple of warm toddies and create on those long, cold winter nights. But this year, we’re casting aside our old hobbies and learning the trendy art of hand or arm knitting. It’s easy, produces professional results and will have your friends thinking you’ve spent hours creating an artisanal piece worthy of any designer home store.
Feeling a little skeptical about knitting? Think it’s a dated hobby reserved exclusively for old ladies? Well, think again. Recent studies indicate knitting is on the rise in the younger generation. Many knitters today include millennials, men, and even school age children. With projects as easy as the chunky, oversized throw and amazing yarn that helps you get stylish results with little effort, it’s no wonder so many people are jumping on the hand knitting band wagon.
To get started, all you need is a bottle of wine (ok, that’s not mandatory, but it is fun), chunky yarn, basic instructions, and a few friends for your first knit and sip party. What a perfect way to spend a winter evening!
The Knitty Gritty of Arm and Hand Knitting
Arm or hand knitting is just like regular knitting except your arms or hands are the needles and all stiches are oversized. Because of the oversized stitches, you can master a chunky throw in a few short hours, accomplishing that trendy look of an exaggerated cable knit sweater currently seen at craft shows, farmers markets, Etsy and our favorite site, Pinterest! If you’re already a seasoned knitter, this version will be a cinch since it refers to a variety of steps and terminology you’re already familiar with. If you’re a newbie, no worries! There are several tutorials that will have you on your way in minutes.
We reviewed both the hand and arm knitting techniques and, despite producing the same end result, found that hand knitting is easier to master, less cumbersome timewise and allows you to work on your project at your leisure, easily stopping and starting as needed.
Keep Calm and Cast On – Getting Started
First off, penny pinchers beware–this is not a cheap project or hobby, especially if you’re using the most popular (and warmest) Merino wool. You may want to consider doing a chenille or synthetic yarn project first before blowing the dough on the expensive stuff. Depending on the size of your blanket, you can do a chenille version (especially with sales and coupons) for under $50. Sure, it’s a bit on the expensive side but you’ll pay twice that for most online versions of the same style, and the thrill of the creation is lost!
It’s All About the Yarn
You can purchase synthetic yarns, like the chenille we used in our blanket, at Hobby Lobby, Michaels and JoAnn Fabrics. Merino wool can be purchased from several online retailers like BeCozi, Amazon, and Etsy, or you can check your local Sin City Knit Shop in Las Vegas. There’s even yarn with premade loops that makes this hobby even easier.
Determining how much yarn is needed can be tricky. We found a helpful chart from “Truly Majestic” to get you started on several different sized blankets; however, keep in mind the yarn amount can vary greatly by the length of your stitches and the material you use. For a better understanding, watch the video on https://trulymajestic.com/much-yarn-arm-knit-blanket/.
What Terminology Do I Need to Understand?
Knitters do have their own language and not just technical terms. For hand or arm knitting, you will need to understand just a few and, most importantly, in this order.
- Slip Knot: This knot functions as the first stitch in your knitting project, or the starting point.
- Cast On: This is the groundwork that forms the base for your project. It establishes the first row of loops.
- Working Yarn: This is the yarn that goes from your ball of yarn to what you’re currently knitting on. It’s your “active” yarn, what you use to actually knit with.
- Bind (or Cast) Off: This is how you secure your loops at the end of your project.
- Stockinette Stitch: Basic knitting stitch used in the chunky throw.
Tips for Newbie Knitters
- Identify your work surface. Using a large, flat surface or crafting table you can leave up works best for hand knitting, as you can leave your project and come back to it at any time.
- Utilize tutorials. YouTube is an awesome resource for amazing tutorials. We really like those we found on the Becozi site, as well as eHow’s “How to Hand Knit a Blanket” video. They’re helpful and explain the project so even the non-knitter can easily understand. Beyond BeCozi, a simple Google search produces hundreds of results for both hand and arm knitting.
- Prep your project. Open the skein of yarn and roll it into a ball. This makes for easier stitching.
- Determine stitch length. If you decide on a three-or-four-inch loop or stitch, use a tape measure to accurately measure each loop until you feel comfortable “eyeballing” each stitch. Count the number of loops you need in each row and pay close attention when beginning each row; this keeps your blanket true to size.
Ladies, Start Your Blankets!
If you’re sittin’, why not be knittin’? Begin with a YouTube video to get a visual on stitching, find the perfect yarn and be on your way to knitting your first chunky throw. We promise, you’ll become obsessed with the results, knitting blankets, scarves, beanies, even dog beds before you know it!
Colorful Chaos The Fluid Art – Dirty Pour Technique

Colorful Chaos
The Fluid Art – Dirty Pour Technique
By DeDee Birdsall
Do you have a tired, worn out coffee or end table that could use a fresh coat of paint and a little TLC? Most of us do. Bring life back into that piece of furniture while getting in touch with your artistic side using a technique called the “Dirty Pour”. A unique fluid art form, the dirty pour is as simple as an at-home science experiment. Here we’ll show you the down and dirty secrets for creating the perfect modern piece from your existing home collection or a roadside find. With little effort, you’ll be on your way to becoming the next Jackson Pollock.
Beauty is in the Eye of the Beholder
So, what’s a dirty pour, you ask? It’s merely a term used for combining multiple acrylic paint colors and a few additives in the same container, then pouring it onto your desired surface and moving it around to distribute the paint. Because of the addition of oil, cells of irregular patterns form, creating a kind of 3D effect. Heat can be applied using a butane torch for added interest, but even without heat the results are beautiful. This versatile technique can be used to create abstract paintings on canvas, tables, coasters, dressers, buffet tops, clocks and more.
50% Fact, 50% Magic – 100% Results
If you’re a newbie to fluid art painting, we’ve taken the guesswork out of the recipe. You’ll need paint, a pouring medium, a thinning agent and silicone; the trick is to achieve the perfect “pouring” consistency without losing the integrity of the paint. Here’s the breakdown, with a recipe that follows.
- Acrylic Paint: Stop by your local craft store and pick acrylic craft paint in a variety of colors.
- Pouring Medium: We’ve found many different recipes using all kinds of household items for the pouring medium, including dish soap, glue, etc.; however, after many dirty pours, we found Liquitex Professional Pouring Medium to be the best.
- Silicone: Rather than looking for the perfect silicone, we used a less expensive and readily available hair oil that works great, Nourishing Coconut Milk Anti Breakage Serum.
- Floetrol: This latex paint thinner creates the unique cells in the end result, and can be found at big box hardware stores.
Nothing Better Than Watching Paint Dry
Dirty pouring is a messy project, so it’s best to have a clean work area before you get started. We suggest using plastic tarps on the floor. A kiddie pool works great for table projects where runoff may be a little more than your average pour on a canvas. Since you’ll be adding oil and pouring mediums, the drying times can be upwards of 24 hours, so create your pour in a space that won’t be disturbed by pets or children. To ensure a successful project, we recommend you start small and find some color and style inspiration before you dive right in; a quick YouTube search will bring back some excellent examples.
A Picture Paints a Thousand Words
To help you better understand the dirty pour as well as the complete fluid art process, here are the most notable pouring techniques
- Dirty Pour: Individual colors are prepared according to the recipe and poured one after the other into a single container before pouring or drizzling. You can carefully mix these with a stir stick before pouring or leave the colors separate.
- Flip Cup: Individual colors are prepared according to the recipe and poured one after the other into a large container (and are not stirred) before pouring the entire cup onto the canvas or furniture piece.
- Puddle Pour: Individual colors are prepared according to the recipe and poured onto the canvas in pools. Additional colors are poured and pooled on top of the original color.
- Swipe: A technique that can be used in conjunction with other pouring methods noted above, the swipe takes place after the pouring. You can use just about anything with a straight edge to swipe, including a paint chipper, small plastic ruler, spatula, etc. Swiping the layers helps move the paint and create cells that vary in size and shape.
What You’ll Need
- A kitchen scale that measures in grams.
- Liquitex Pouring Medium
- Floetrol
- Nourishing Cocomilk Hair Serum
- Water
- Acrylic craft paints
- Plastic cups
- Popsicle sticks
- Rubber gloves
- Table/workspace covering
Recipe for Success
Follow this recipe for the perfect pour every time.
40 grams Floetrol
20 grams Liquitex pouring medium
10 grams water
20 grams acrylic paint
2 drops hair serum
Combine Floetrol, pouring medium and water in a container and gently mix with a popsicle stick. Place back on the scale and add 20 grams acrylic craft; gently stir to mix the color into the medium. Add 2 drops of hair serum and gently mix.
Note: This recipe adequately covers a 10-inch by 16-inch area. Depending on your project size, you may need to mix additional cups.
Finishing your Project
Drying times will vary depending on the additives you use, but once dry, you’ll want to add a bright finish to give it that “just poured” look and to preserve your artwork. If you are protecting your tabletop, consider coating it with resin, found at hardware and craft stores. If resin is too expensive, varnish is a less expensive option. For finishing wall paintings, Liquitex offers some perfect mediums to do the trick, but resin can also be used. There really is no limit to your creativity. Happy Pouring!
Tip: Before sealing your project, clean your painting with isopropyl alcohol to remove the silicone.
“We don’t make mistakes, just happy little accidents.” — Bob Ross
Relax with Wax – Guide to Candle Making

Relax with Wax – Guide to Candle Making
By DeDee Birdsall
Candles have been around for centuries. Research suggests that ancient Egyptians burned candles made from beeswax as early as 3000 BC. In those days and for hundreds of years to come they were primarily used for light and religious and spiritual worship. No longer necessary as a light source, their usage has evolved into an essential home décor item, hitting marks in both aromatherapy and decorating trends. They freshen the air and fill your home with delightful aromas of freshly baked goods, elegant florals, notes of holidays and anything that strikes your fancy while creating a relaxing environment.
Wax and Wane – Old Trends
Trends in design and popularity have changed over the years, but the basic principle is the same. A quick look back over the craft conjures up memories of making ice cube and snowball candles from melted paraffin, sometimes using metal coffee cans and cottage cheese containers as molds, in my mom’s kitchen in the mid-1970s. The mid-80s brought an explosion of shapes, colors, and for the first time–scents, kicking candles into high gear as a multi-functional decorative accent.
Significant changes in candles came about during the 90s with the development of new waxes, such as soybean and palm, which were much softer than conventional paraffin and slower burning. Also, they were a little more environmentally correct, with less suet; no more black stains on the ceiling. We also rolled our share of beeswax taper candles during this era, and little skill was required–just the ability to tightly roll a sheet of beeswax. Today, new trends set candle making apart from its earlier days.
Can’t Hold a Candle to Today’s Trends
Modern trends suggest more staying power with scents, wicks and unique vessels. Before you dive in, here is some food for thought.
- Wood Wicks: A fun addition to your candle, wood wicks are easy to use and provide a little crackle, like that of a burning fireplace. The flame is horizontal, so your candles achieve a melt pool quicker, which fills your room with scent much faster than a traditional candle. Wood wicks come in various colors and printed designs and are a must try if you’re looking to add a visual and audible experience. They can be found at Hobby Lobby, but for custom sizes, try The Wooden Wick Company (www.woodenwick.com).
- Trending Colors: 2019 trends indicate colors run the gamut from primary to earth tones with matching scents like brushed suede (tan), fresh fir (green), coffee house (black), grapefruit and persimmon (red).
- Sentimental Connections: Gone are the standard vanilla and sugar cookie days. There’s a significant trend toward scents that invoke memories, such as Campfire Nights, Walk in the Woods, and Fresh Rain. One of the most popular new scents is Flowerbomb, first developed into perfume by Victor & Rolf. It’s a genuinely magical scent and an explosion of florals with a hint of seduction. Because it is difficult to mimic and requires many different oils, you can cut to the chase and order the scent from fragrancebuddy.com.
- Distinctive Vessels and Sustainability: Next to fragrance, the candle’s container is a top selling point. Anything that can hold hot wax will work, so a quick look around your home, garden shed, or flea market might turn up the perfect container to compliment your home’s décor. For a sustainable option, plan on planting a succulent in your container once the candle has burned its last flame.
Crafty People
Crafters and DIYer’s have been making candles as long as we’ve had fire and wax. Endlessly customizable, naturally beautiful and simple to make, they’re a crafter’s favorite, but if you feel you’re too much of a newbie to go it alone, you can purchase a candle making kit with all the necessary materials. A couple great sources for kits are www.candlewic.com and www.candlescience.com\kits.
There are no limits to the types of candles you can make–from 50-hour candles that will weather any power outage to essential oil candles to indulge your senses. Candle making is also an excellent craft you can do with the kids; you can even make terrific teacher gifts using melted crayons.
Materials
All candles contain the same three components: wax, a wick, and a container, but you will need a few other supplies to get started. The best place to start is to determine a few basics–your color, your scent, and your vessel. Hobby Lobby and Michaels are excellent sources for your supplies, as well as www.candlescience.com and www.woodenwick.com.
Required Supplies
- Candle-making wax
- Wicks
- Fragrance oil
- Heat-proof spatula
- Heat-proof container
- Double boiler
- Cooking thermometer
- One pair of chopsticks or pencils
Candle Crafting in 8 Easy Steps
- Measure how much wax you need to fill your container, then double it.
- Pour wax into a double boiler and allow to melt for 10 to 15 minutes, stirring occasionally.
- Once melted, add your fragrance oil according to your wax container instructions.
- Next, attach the wick to the container by dipping the wick in the wax and adhering it to the bottom, or you can use superglue.
- Cool wax to 140 degrees F. Slowly pour while holding the wick in place, leaving a little in the container to top off the candle once cooled.
- Secure your wick to prevent it from swaying in the melted wax. You can use pencils or chopsticks across the top of the container and place the cord between them so that it stays centered while the wax cools. Set wax for four hours.
- Reheat and pour new wax if your candle hardened with an indentation around the wick or could just use a little top off.
Tip: To prevent an indentation or cracks around the wick, add 1 1/2 cups of organic shortening to a half pound of wax before melting.
- Trim wick to less than a half inch. If it flickers or has a tall flame when burning, trim again.
Tips for the Perfect Candle
- Paraffin, soy, beeswax or gel? A good source for info about each is www.savvyhomemade.com/candle-making-wax/.
- For scents and essential oils check out candlesandsupplies.net/Fragrance-Oils; www.candlewick.com; and www.woodenwick.com.
- Allow candles to cure 3 to 4 days before burning to allow scents and wax to bind together.
- If you plan to use essential oils to scent your candles, add when the wax is hot, but not too hot, or you will evaporate the oils.
- Need help determining how much wax to use? The link candletech.com/candle-making/tips-and-tricks/handy-calculators/ tells you the amount based on the size of your vessel.
Curiosity is the wick in the candle of learning.
–William Arthur Lord—
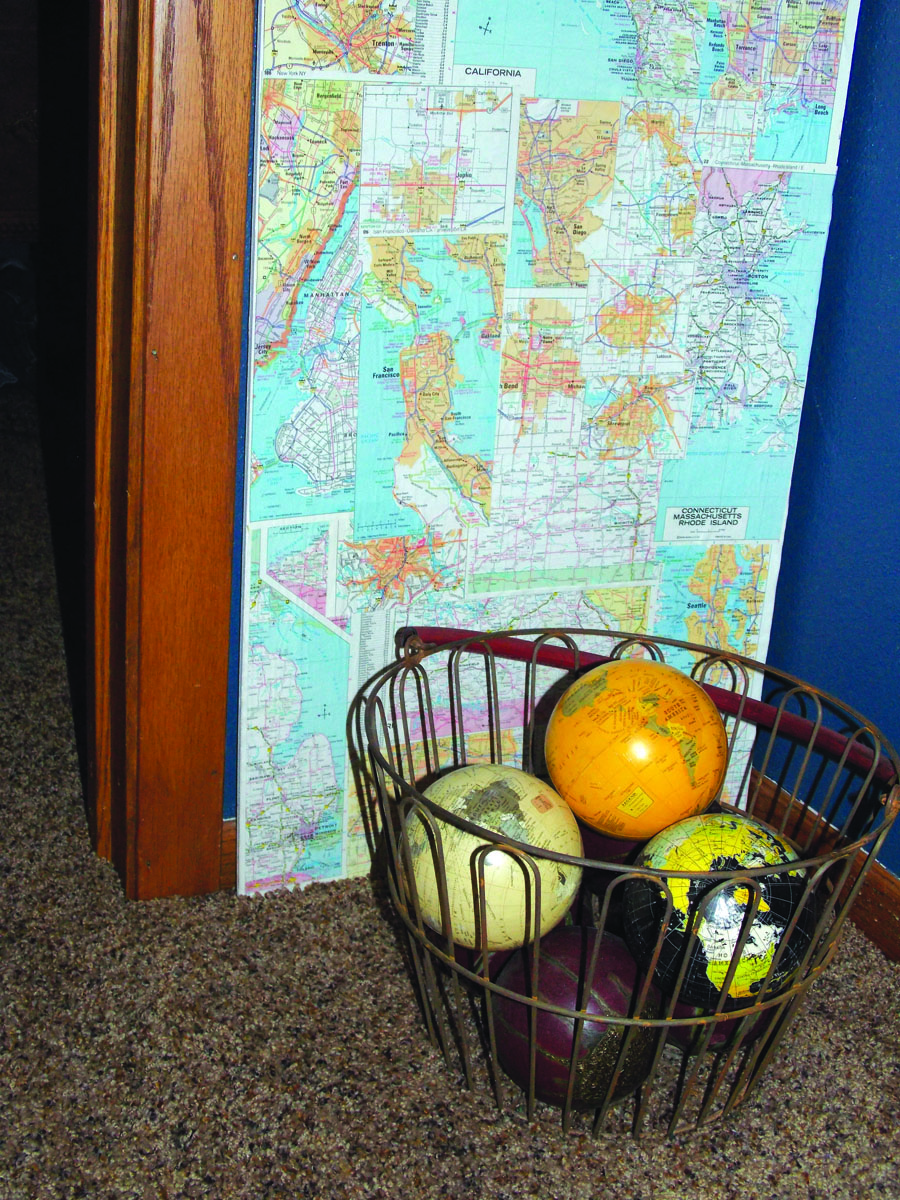
Around the World Style: Using Maps for Adventuresome Crafting Projects
Maps and atlases drum up a sense of adventure and nostalgia for most of us. Those archaic, worn and tattered resources now tucked in a drawer or stuffed in the glove compartment of the car are a nostalgic symbol of family trips from our youth. Today, our own children haven’t a clue how to use a map, instead relying on that lovely female voice that spends most of her time “recalculating” our route and surprisingly never gets angry when we don’t follow her instructions! So, now that the paper map is almost obsolete, how about repurposing it into trendy home decorating projects and wearable art? What better way to keep nostalgia alive while going green at the same time!
By: Dee Dee Birdsall
Don’t Have a Map Stash?
No worries! Find fun vintage options online or at antique shops, and don’t discount stopping by your local Chamber of Commerce. If you decide to purchase regular US and state road maps, you’ll find them priced around $5.99 at an office supply or convenience store. Etsy and eBay are also great resources for unique maps. Finally, as an easy alternative, consider using map wrapping paper for your projects. Check out www.paper-source.com for their Cavallini World Map wrapping paper option.
Map Jewelry
This is a simple, quick and easy project. You can create a wonderful personalized map location cluster pendant which can be built over time or worn individually to capture those cherished locations that hold a special story in your heart.
How To:
- Purchase one-inch round pendant bezels, glass inserts, and E6000 glue (E6000 glue is anindustrial, high performance adhesive that is ideal for jewelry and beading applications). You can find all this at your local craft store jewelry section.
- Using a map or atlas, cut out the city of your choice – making sure to cut it larger than you need.
- Using a scrapbook one-inch round cutter, center the city within the cutter and cut circle.
- Place a dab of glue on the inside of the bezel and affix map piece.
- Place a dab of glue on the flat side of the glass and affix glass to the inside of the bezel.
- String your pendant on a ball chain and you’ve got a unique necklace.
Time Travel – Clock Face Update
Using a World map, update your clock face! Once finished, this project rivals the more expensive versions you see at Pottery Barn and Ballard Designs, but for a fraction of the cost.
How to:
- Remove the outside plastic face from the clock.
- Using the clock face, trace the size of the dial onto the map.
- Gently remove the clock hands from the dial.
- Tape off the clock frame to avoid spraying with adhesive.
- Using spray adhesive, spray the front of the existing clock dial.
- Affix cut map piece to the adhesive ready clock dial.
- Replace clock hands and outer plastic face.
Child’s Play- Geography Lesson
A child’s stool quickly becomes a unique piece when you decoupage a map to the seat and paint the stool in various accent colors. Use the stool to study the continents and boost a toddler to a higher level.
How to:
- Paint all surfaces of the stool or chair with the map accent colors.
- Cut map piece for the stool top.
- Using decoupage glue (purple labeled Mod Podge, meant for wood), apply a coat to the chair and to the map piece.
- Apply the map piece to the chair.
- Using a plastic scraper, remove the air bubbles from the map piece.
- Using a light sanding block, gently sand the edges away from the outer edge to create a smooth map edge.
- When finished, cover entire top with a coat of Mod Podge and let dry overnight.
- To finish the chair, use Minwax Wipe-On Poly and apply three coats, allowing each coat to dry before the next application.
Upgrade a Shade
Illuminate your adventurous spirit by upgrading a ho-hum lampshade to a city or region in your travel dreams. Place the lamp on your nightstand and you’re halfway there! Drum or rectangular lamp shades work best as the top and bottom measurements are the same, making for easy installation.
How to:
- Remove the shade from the base.
- Measure and cut a pattern from craft paper.
- Cut the map using the pattern.
- Using spray adhesive, apply adhesive on the lamp shade surface.
- Carefully apply the map to the shade, working out any air bubbles.
- Let dry, insert your light bulb and enjoy!
With these kick-start project ideas, let your imagination be your guide for around the world décor!
Join the Design Revolution! Creating Custom Fabric, Wall Paper, Decals and Gift Wrap
By: DeeDee Birdsall
Did you catch the Project Runway episode where contestants were given the challenge to design and create their own fabric in less than an hour? “I’d love to create my own fabric,” you might have thought. “But wait — I’m not a designer!” Maybe you’ve been looking for that perfect wallpaper or gift wrap for a special room or occasion and just can’t find the ideal pattern to complete your vision. Well, fret no more. Whether you’re a fashionista, a seamstress in search of the perfect fabric or an occasional crafter with a hankering to create something truly unique, all you need is a little creativity and the help of technology to create personalized materials with professional results.
The Power of Spoonflower
In the old days we crafters could print our own designs onto fabrics, calendar pages, clear decals, etc. using ink jet printers with specialized sheets of materials. The size constraints were obvious, as was the substandard quality in color and saturation if you had more than one sheet to print. With the power of the Internet, creating your own designer items has become dramatically revolutionized. There are several websites that help you design your own projects, and although they have similar design concepts, services and pricing, Spoonflower.com stands above the rest in terms of ingenuity. Spoonflower includes a community connection to other designers (currently over one million users), and encourages creativity by hosting giveaways, contests such as “Design of the Week,” a BlogSpot, virtual studio and storefronts, plus ways to earn royalties if you choose to sell your designs. It is the largest network of independent fabric and wall covering designers in the world and the great thing about those designers is that many of them are just like you and me! Best of all, they offer an array of projects to brighten up your home and gift giving options while letting your inner designer show through.
One-of-a-Kind Textiles
Whether making pillows, curtains, quilts, or other home decorating or wearable items, the fabric sets the tone for the finished project. With Spoonflower you can design your own unique pattern then print swatches, fat quarters, or entire yards of fabric. The site provides several design layout options, step-by-step instructions and examples, plus it hosts an online gallery of thousands of fabrics for purchase. Pricing ranges from $17.50 a yard for basic combed cotton to $38.00 for silk crepe de chine. They also offer a 20% discount on purchases of 20 yards or more.
Wallcoverings and Decals
How many times have you had a vision of the perfect wallpaper and not been able to find it? What about the labor-intensive removal process once that oh-so -1980’s pattern has lost its luster? Today’s wallpaper is a different story and Spoonflower’s print-on-demand totally removable wallpaper is an excellent choice. Perfect for temporary homes that need a facelift (i.e. college dorms, apartments, etc.), each roll comes in the standard 24ft x 12ft size at a cost of $60.00 each. Considering that awesome design from Anthropologie at a cost of $168.00 per roll? Now you can create your own similar look for a lot less cash!
Looking to snazzy up your room but don’t want to cover an entire wall? Spoonflower also offers custom-designed peel and stick wall decals or murals. Offered in three different sizes, they can add a whimsical feel to a child’s bedroom or playroom, or create a sophisticated scene that adds drama to the more formal spaces in your home. Pricing ranges from $5.00 to $30.00 each.
Gift Wrapping Options
Want your gift to stand out from the crowd at your next wedding, baby shower or birthday party? Spoonflower provides a custom gift-wrap option that takes your design and transforms it into a work of art. It’s a fun way to create something truly unique that you can personalize – no gift tag required! Gift-wrap rolls cover approximately four average sized gifts for a cost of $15.00 per roll.
From Digital Photos to a Designer Masterpiece
Getting started on Spoonflower may take a bit of practice and knowledge of sending digital files, but it’s a simple, six step process once you get going. Before getting into full board design mode, it’s recommended that you order a color map, color guide, and a swatch booklet off the site. This is an inexpensive way to verify you’ve chosen the right colors and fabric for your project the first time around!
- Upload your image. Any photo or design image you have saved in a standard file format such as a JPG, PNG or GIF can be uploaded to Spoonflower. Don’t have an image? Hundreds of images are free, or for sale on sites such as www.Shutterstock.com. Make sure to read the fine print, as many images are not for resale. If selling your finished design is your goal, heed the warnings and don’t violate copyright laws.
- Edit your design. Using Picmonkey.com, a free online editor linked to Spoonflower, you can edit your image to include color changes, size, special effects, frames, and more. For high-tech editing use Photoshop outside of Spoonflower and upload your finished design. Keep in mind, color is your responsibility. Be sure to order swatches prior to full yardage production as to not be disappointed in your finished product.
- Create a design repeat. Spoonflower prompts you to determine your design placement. A basic repeat creates tiles of your design horizontally and vertically, while other options include half-drop or half-brick staggers.
- Proof your design. Once you’ve ordered your design there’s no turning back! Take extra time to verify the design is as you intended prior to production or offering it for sale in the virtual shop! Use your resources to assure the color is as you envisioned. All sites assume once you have placed an order, the product is finalized.
- Print your design. Using the step-by-step instructions, order the type of fabric and number of yards. If you’re unsure of fabric types, make a quick trip to your local fabric store and ask for a quick lesson in fabric types and weights, then match what’s available on Spoonflower, choosing what’s conducive to your project.
- Sell your designs (optional). With a click of your mouse, you can make your designs available for sale in Spoonflower’s virtual shop. As the designer, you retain the rights to the design and earn 10% of the sales. Earnings are paid in the form of “Spoondollars” which can be used to purchase other items from the site, or can be paid to your PayPal account monthly.
Design Project Ideas
You’re limited only by the imagination as to what can be designed on the Spoonflower site. Consider these ideas to get the creative juices flowing!
- One-of-a-kind lining for totes and purses
- Designer gift-wrap with children’s names, business names, photos, etc.
- Personalized growth charts or cartoon frescos from decals and murals.
- Customized tablecloths and napkins for weddings, family gatherings, gifts.
- Print family recipes to make tea towels or aprons.
- Upload children’s artwork to make teacher and grandparents’ gifts.
- Create matching fabric and contrasting wallpaper for any room in the house.
- Upload company logos to upholster office chairs or use for wallpaper and decals.
- Cover a lampshade; make pillows and other home décor items.
As Robert Frost once said, “The artist in me cries out for design.” Explore your inner artist and create fabric, home decorating and gift-wrapping options that are uniquely you!
A Blank Canvas – Drop Cloth Home Décor
By DeDee Birdsall
We tend to think of drop cloths as not being good for much but catching spilled paint, but they can actually serve another purpose as a versatile, inexpensive and trendy decorating fabric. Whether paint stained or fresh out of the package, the amount of project possibilities that drop cloths provide are virtually endless. Although it’s not a new trend on the home décor scene, it’s still a great, inexpensive method for sprucing up your home at minimal cost.
As a decorating fabric, drop cloths provide limitless potential. You can craft just about anything with a textured look for a lot less than standard fabric. Drop cloths complement a multitude of design styles, from traditional and country to cottage and shabby chic.
Size, Style and Cost
Drop cloths come in a variety of sizes, fabric and weight, so make sure that you’re purchasing the correct size and type that you’ll need for your particular project. One of the best things about the drop cloth is that its width is greater than your average fifty-four to sixty inch wide decorator fabric, making it an excellent, stand out choice for large projects.
For our projects, we used the 6 x 9 Blue Hawk 8-ounce canvas drop cloths from Lowe’s. This option offers an oatmeal shade with a great texture and weight while also being washable and resistant to water and mildew; an excellent choice for outdoor projects.
So what’s a drop cloth cost? Standard cloths come in a range of sizes and prices including:
- 4 x 5 ($5.98)
- 6 x 9 ($10.98)
- 9 x 12, available in 8-ounce ($18.47) or 10-ounce ($26.98)
We estimate the cost per yard to be less than $2.00, which is practically a steal for decorator fabric. Fabric in the same weight and durability can often cost more than $25.00 per yard. At that price, there’s no reason any DIY decorator shouldn’t pick some up on the next trip to the home improvement store. All come machine hemmed and can be easily transformed without a great deal of artistic talent or seamstress skills. It just takes a small dash of crafty creativity.
Project Possibilities
The projects we’ve chosen include outdoor curtains, embroidered throw pillows and a sassy half apron. But don’t let your imagination stop there! Other fun ideas include bedspreads, tablecloths and totes. If you’re feeling adventurous, you can even reupholster an old chair to give it that high class Pottery Barn or West Elm look that comes complete with the fabric’s “character adding” flaws. Inspiration is merely a click away. You can check out project resources at www.onlyfromscratch.blogspot.com, www.houzz.com/drop-cloths or Pinterest.
Once you’ve chosen a project, all you need to do is purchase your drop cloth(s), then make sure to wash, dry and press them to remove sizing and rid the fabric of that “drop cloth smell.” When that’s all said and done, you’re ready to start on these fabulous creations.
Drop Cloth Pillows
These ruffled, stenciled, and embroidered throw pillows can add flair to any living space. All pillow covers are envelope style, easy as cutting three pieces of fabric and some straight stitching, which doesn’t require a lot of time or talent in the sewing department. If you can sew a straight line, you can make these covers. For simple instructions on making these envelope cases, visit www.ehow.com/how_4425862_make-envelope-pillow-case.html.
Stenciling the pillow front before sewing is a simple task that adds a lot of character. It only took minutes to apply and dry, and with the help of a friend’s embroidery machine, we turned an otherwise mundane throw pillow into a show piece that’s sure to catch any visitor’s eye. Comfiness is key for any place you’re going to rest your head, but the unique factor and artistic design help make these pillows one of a kind.
Even ruffles are a snap. Cut strips of fabric twice as long as the pillow width and set your machine stitch length to the highest number, also known as the basting stitch. Center stitching on the strip and sew a straight line from the top to the bottom of the fabric. Cut threads and pull the bobbin (bottom) thread until the gathers form. Slide to position the gathers evenly. Change your stitch length back to a normal setting, then lay the strip on the front of the pillow fabric, pin in place and stitch along the gather line using a regular stitch. Once the ruffles have been added, stitch the front and back pieces together, turn it right side out and slide your pillow inside. If you need to clean the cover, remove the pillow and wash.
Drop Cloth Curtains
Finding ready-made curtains or drapes for large or tall windows can be a costly endeavor, and searching for affordable outdoor curtains is next to impossible. With drop cloths, you can create a panel for your home or porch for under $10.00. For our curtain, we purchased paint samples ($2.98 each) in the latest decorating colors and used a flower wall stencil to create this trendy looking outdoor curtain. Additional supplies also included the rings for hanging.
Fun and reusable stencils can be found at www.cuttingedgestencils.com, but if stenciling isn’t your favorite thing, you can hand paint a design or add fabric, ribbon or other embellishments instead. Contrasting fabric sewn on the top or bottom can add great color. You can also change the color of the fabric by bleaching or dyeing as we’ve done with our stencil. For extra protection, spray curtains with Scotchgard Outdoor Water Shield.
Drop Cloth Kitchen Couture
Now that you’ve spruced up the living space, it’s time introduce a little drop cloth style into your kitchen routine. A pretty half apron can be crafted using about a half yard for drop cloth fabric. Drop cloths are excellent fabric for aprons and they stand up to the pressure with their durability and they’re maintenance friendly; a quick toss into the washer and dryer and they look like new again. It’s a great gift for a “foodie” or gardener friend and it can be personalized by embroidery, hand painting or fabric markers. A little rick rack and contrasting fabric and you’ve got a sassy little number that’s as affordable as it is functional.
Decorating and crafting with drop cloths might not be the first thing that comes to mind when you think of arts and crafts, but you’ll quickly find that it’s a unique and easy way to bring a clever sense of fun and flair to your home. “Drop” what you’re doing and get into it today!
Stunningly Simple – DIY Artwork
By DeDee Birdsall
Maya Angelou once said, “You can’t use up creativity. The more you use, the more you have.” We’ve all marveled at those with artistic talent and wished we could do the same. Well, now you can. Creating artwork for your home, office or to give as gifts just got easier as we’ve come up with some DIY artwork projects to help you explore your creative side. With a little help and a few supplies, you’ll wow your walls with wonderful art you can make at home and on a budget.
We’ve included price range estimates to assist with project costs, so use this key as a guide:
• $ – $20.00 or less
• $$ – $50.00 or less
• $$$ – $100.00 or less
The Right Supplies
Never painted before or suffering from painter’s block? We’ve provided a few easy ideas to inspire you and get you started. For the beginner, here are a few basics and required materials.
Paints
Acrylics are the best for the beginner as they’re easy to use, dry fast, and can be mixed or diluted to give you a professional, finished look. For our paintings, we chose Liquitex Basics, developed for students and artists who need dependable quality acrylic paint at an affordable price. Basics have a high sheen and simulate oil paint, but they’re also water resistant and permanent. For the sake of convenience, many of the paints are numbered according to the artists’ academic level. Therefore, if you’re a newbie, simply choose Level 1 paint and you won’t be out of your league.
Canvas
Depending on the size and style, canvases can range from as little as a few dollars to several hundred. You’ll want to consider the size and look you’re hoping to achieve before making your purchase. Canvases also vary in depth for different finished looks that are either intended to be framed or painted. You can purchase canvases at any craft store, so watch out for store sales or save your coupons. This can help save you considerable money if you’re looking for larger sizes.
Brushes and Palates
You can purchase brushes from the craft store, use small brushes from your tool cabinet, or even purchase foam brushes from the hardware store. All were used on our painting to give unique and different brush strokes. Save yourself money as other inexpensive around-the-house brushes will do the trick. As for a fancy palate, skip it. Paper plates work just fine and cost far less.
Patterns
Don’t want to go it alone? Consider using DecoArt Social Artworking patterns or kits ($4.99). Found at Jo-Ann Fabric and Craft stores, these include a supply list, pattern and transfer paper, easy step-by-step instructions and a full color image of what the finished canvas should look like.
Now that you know the fundamentals, here are a couple of painting projects to get you going:
Herringbone/Geometric Painting ($$ – $$$)
A great project for the beginning painter or those who don’t feel adept at crafty things; it’s fun, fast, easy and forgiving. Start by covering the canvas and side with a base color. Using a variety of brushes, swirl all your colors onto the canvas, then overlap colors and sizes of swirls or brush strokes. Cover the canvas completely using this technique, then allow the paint to dry.
Once the paint is dry, cut and apply pieces of masking or painters tape in a Herringbone pattern. Using a foam brush, paint a lighter shade over the entire canvas and tape. Once dry, remove the tape. Repeat and continue overlapping colors until you’ve reached your desired effect.
Affordable Copycat ($$ – $$$)
For the artist on a budget still looking to create something fun, exploring your copycat side is the way to go. We took our inspiration from artist Matthew Heller’s “Falling Ifs” print, recently featured in the CB2 catalog. As a fun and inspiring DIY project, we were able to change it up a bit and keep the cost down while still creating a project that was simple and interesting.
We used plastic stencils to create the “Ifs” but cutting letter stencils from everyday kitchen sponges will provide a more true-to-life copy; if you don’t care for Heller’s work, you can choose any collection of inspiring words and start painting. Cover the canvas with a base color, even if you choose white. We used Liquitex Basics Parchment and applied it with a 1.5 inch foam brush for a graduated look. Once dry, add the words and you’re done! Hang and enjoy.
Paint Chip Photo Art ($)
If actual paint isn’t your thing, using paint chips is a great way to create affordable wall art. For those that don’t know, paint chips are the color sample cards that you use to help pick out what shade of paint you’d like to buy and are available at most major home improvement stores. We’ve chosen a photo project that utilizes them to help create a distinctive gift that takes minutes to complete. No need to stress over colors, either, because any color will work. For this project, we’re using the large gradient, tri-color paint chip in a 4×5” size as photo paper. Some stores may not carry this particular size, but larger chips can be cut to mimic 4×6” or 5×7” photo stock.
Choose a favorite photo on your computer and use photo software to change the exposure to black and white or sepia. You can also crop the photos to include only certain portions. Adjust your printer settings to print the appropriate photo stock size (4×6” or 5×7”) then feed the paint chip into your printer and print your photo. Arrange the photos in a vertical frame and hang.
Remember, finding the right colors is easy, the bolder the better, and you can mix and match for the perfect look. If you don’t have an inkjet printer or would like a better quality photo, take your photos and prepared paint chips to a Quick Copy center and ask them to produce them for you. The overall cost is minimal and can be completed for as little as the price of the frame.
Cost Effective Crazy Wallpaper ($$)
For something a bit simpler, you can still get inspired with custom artwork. Start by wrapping an artist’s canvas with wallpaper; a single roll or less will do. Simply adhere the paper to the canvas using a staple gun or hot glue gun, then print your favorite quote onto inkjet waterslide decal paper and affix it to your covered canvas. The entire project should be done in less than an hour.
If you need some inspiration, wallpaper sample books can be found on sale at home improvement or paint stores or directly from manufacturers. You can also use fabric instead of wallpaper if the pickings are slim. For added texture, purchase a roll of paintable textured wallpaper and spice it up by painting it a solid color and using metallic paint for raised accents. To cut costs even further, consider reusing an old canvas painting that no longer suits your style.
Need more ideas? Go blog hopping or Pinterest surfing for DIY art and you’ll be amazed at what you see. You can also bring your friends in on the act with “Design and Wine Parties” and make amusing art with your best buddies. More details are available at www.mydesignandwine.com. No matter how you go about it, remember that just because you don’t feel creative doesn’t mean you can’t be creative. It’s as easy as finding the supplies you need and remembering to have fun!
What’s Trending Now…
By DeDee Birdsall
Ottomans have been around as long as man has sat upright, but this long-time staple has taken on a whole new life. With a little ingenuity and a small amount of effort, you can transform your favorite footrest into extra seating, storage, or simply a trendy accent piece. And best of all, you can create them yourself using a wide variety of easy to find materials and objects. Ottoman designs are all over the internet, and a quick Google search will get you started. Add a bit of imagination and a dash of creativity, and you’ll have your own homemade ottoman in no time!
Ottoman Styles
The style and types of ottomans vary as much as any other type of furniture, both in artistic design and intended use, but we’ll be focusing on two specific types for this article:
As the name suggests, comfort ottomans are designed with the intention of being used as foot stools or small places to sit down. This style of ottoman is typically covered with fabrics that range from cotton to tufted leather and is most commonly rectangular, square or round shaped.
Truly the most multi-purpose of all ottomans, storage ottomans are designed for seating, foot rests, and storage and often include a hinged lid for easy access to the storage compartment. These work great for small rooms where storage is at a premium and closets are already full.
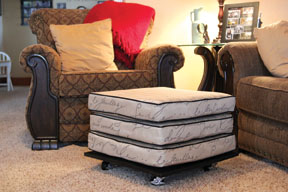
DIY Box Cushion Makeover – Comfort Ottoman
This DIY option requires a few basic design skills, but it’s easy to create and can be completed by purchasing and covering cushions or using existing couch cushions. A versatile ottoman, you can roll it anywhere you need it or lock it into place to create a stationary piece of furniture.
Supplies You’ll Need:
- Two to three couch cushions or purchased box cushions
- Decorator fabric to cover the cushions
- Plywood cut to the size of the cushions (for the base)
- Spray paint in your color choice and finish
- Four casters (available in a variety of sizes)
- Power drill
- Velcro circles
Here’s How:
Choose two or three cushions. Measure the cushions and cut fabric accordingly. Sew cushion covers and place cushions inside the covers. Have a piece of wood cut to the size of your cushion at your local lumber store. Our example used 22 x 22 inch cushions, so we chose a ¾ inch birch plywood in a 2 foot x 2 foot size and had it cut to 22 x 22. Paint the wood base and let it dry.
Drill four holes in the wood, each approximately two inches in from each corner. Screw the casters into the holes. Flip over so the casters are on the floor and stack the cushions on top of the wood platform. For best results, use a non-slippery fabric on the cushions, such as canvas. Silkier fabrics tend to slip, which isn’t conducive to relaxation. For a quick stop on falling or sliding cushions, add a piece of Velcro (round Velcro patches) to each corner of all cushions.
The Moroccan Pouf – Comfort Ottoman
Morocco is known for amazing furnishings made from handmade fabrics and textiles. The “pouf” is one such specialty: a round, stuffed ottoman usually constructed of metallic leathers or ornamental embroidered fabrics. Unlike other types of ottomans, they have soft edges and offer great comfort, perfect for a little rough play in a kid’s room or extra seating in the living room. Poufs can add color and design to any room, but have a little more structure than the old school bean bags of the 1970s. True Moroccan poufs can be quite expensive, but you can create your own for as little as $50.00.
Here’s How:
Visit http://www.bhg.com/decorating/do-it-yourself/accents/make-a-pretty-pouf/#page=2, where you can find a pattern, a list of supplies you’ll need and step by step instructions. For best results, use a heavy decorator fabric. Old clothes, worn towels or fabric scraps can be recycled as stuffing, putting old linens to use. We stuffed ours with old canvas drop cloths and towels, and used fiber fill and foam to create the smooth outside surface. Rolled bath towels layered around the bottom and sides of the pouf add strength, stability and structure to the finished product.
For a slightly different look, you can try this step by step process for making a square pouf: http://www.apartmenttherapy.com/how-to-make-a-modern-beanbag-p-113771
Another pouf can be made from repurposing a recycled, oversized sweater, as found here: http://www.cabin-fervor.com/2011/12/diy-sweater-pouf.html
The Stowaway – Storage Ottoman
Both pretty and practical, the stowaway ottoman was popular in the 1950s and was often covered in textured vinyl and perched within a black metal frame with a handy dandy storage compartment. Stowaways are still popular today as double duty furniture. If you manage to score an original 1950s version as we did, you can reupholster it in trendy fabric to add a splash of retro to your décor. Using an old trunk or container lets you create a focal point for your room with no sewing! A staple gun, upholstery padding, and decorator fabric will do the trick.
Supplies You’ll Need:
- Storage item such as a trunk or an actual storage ottoman in need of a facelift
- Three to four-inch upholstery foam and fabric (enough to cover the foam pad)
- Decorator fabric
- Staple gun and staples
- Sewing machine (optional)
Here’s How
If you’re using a storage ottoman in need of a facelift, remove the hardware, top and existing fabric. Save the existing or original fabric to use as a pattern for your new fabric. Cut new fabric using your pattern. Sew the new cover using the old one as your guide. Stretch the new stitched cover, holding it taut as you staple the fabric in place on the top and bottom of the ottoman.
When using a trunk, no sewing is required. Measure and cut the upholstery foam to fit the top; a three inch seat base is best. Keep upholstery padding in place by covering the foam with the upholstery fabric and wrapping over the foam. Staple this to the base to assure no slippage when stapling your decorator fabric. Cut decorator fabric to fit the top of the ottoman, leaving at least three inches on all sides. Hold upholstery fabric taut as you staple. Trim any excess fabric.
Ottomans are more than just a place to prop up your feet. They can be fun and stylish additions to any home, adding color and flair to your living space. Best of all, you don’t have to be an expert seamstress to put them together from scratch and create a delightful new brand of décor.
Show ‘Em Who’s Moss –
By DeDee Birdsall
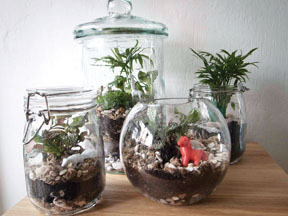
Ask anyone under forty to tell you what a terrarium is and you’ll likely get nothing but a puzzled look. Not surprising, since terrariums haven’t been much of a “thing” since the 1970s. The old school miniature glass gardens were often planted in used aquariums with run of the mill house plants, but today’s terrariums are taking on a trendy, decorative new look. With the right supplies and a little imagination, you can turn this easy and affordable hobby into something special and have your own new “garden” in no time flat.
The More Things Change…
With today’s growing interest in handmade crafts and all things DIY, the new generation of terrariums meld a dose of the 1970s mixed with the creative flair of the modern era. This new variety includes not only interesting vessels, but also a range of plant species, mosses and miniatures creating delicate tiny scenes, including the popular fairy gardens, which feature pint sized plants and accessories that hope to entice tiny, magical visitors.
Other miniature options include people, animals and small garden accessories. Searching the doll house section of your local craft store or raiding miniature train and landscape sets can also do the trick. For additional inspiration, you can visit http://www.miniatire-gardens.com or do a Google image search on “terrarium” for visual ideas. Another good resource is Tiny World Terrariums: A Step-by-Step Guide to Easily Contained Life by Michelle Inciarrano and Katy Maslow, available on Amazon and in local book stores.
Through the Looking Glass
While it’s easy to spend a lot of money on a fancy terrarium vessel, you should consider taking inventory in your attic, basement or garage for an old fishbowl or cookie jar that’s just waiting for a new purpose. If no such treasures can be found, scout your local flea market, garage sale or craft and hobby stores for unique, one-of-a-kind homes for your new glass garden. Think outside the box and create open or closed terrariums made of mason jars, brandy snifters or vintage cookie jars. You can even turn an old light bulb into a mini-terrarium, as seen here: http://thehipsterho.me/2010/01/how-to-make-a-tiny-terrarium-in-a-light-bulb/. The possibilities are limited only by your imagination.
Searching for the perfect container is half the fun, and there’s no limit to the size as long as it’s conducive to planting, has clear glass and includes an opening wide enough to place your plants in. Remember to allow plenty of headroom for your plants to grow and make sure you wash it in hot soapy water, rinse well and dry completely before planting.
How Does Your Garden Grow?
Finding the perfect sized plants for your terrarium can be tricky. Depending on the type of terrarium, you’ll want to purchase small plants that all require the same type of care. For example, use all tropical sun-loving or all drought-tolerant plants, but never combine the two in the same terrarium. First and foremost, find plants that you love. In our example, we planted three different types of gardens: the standard plant garden, a moss garden and an air fern garden. The best terrarium plants are those that stay small, prefer low light and thrive in humid conditions, while others work better in less humid setups.
Plants that flourish in humid conditions (terrariums with a lid) include some species of ferns such as variegated spider fern, but not all ferns are conducive to terrarium plantings, so make sure you do your research. Moss is also a good choice. You can collect your own from nature or order online from places such as Teresa’s Plants and More Store at www.teresasplants.com. Moss should be kept constantly moist and have an abundant light source. Lidded terrariums placed in filtered light work best. Other options include selaginellas, gesneriads or soleirolia. When things are going to be less humid, good plants include African violents, bromeliads (air ferns), begonias, orchids, peperomias and ivy.
Still at a loss for plant types? Check out http://glasstropics.com/content/guide-popular-terrarium-plants for a guide to suitable terrarium plants classified by condition or enlist the help of your local garden center. Most carry specific terrarium species and can assist you in selecting plants with similar growing requirements. Remember to tell them if your environment will be more humid (terrarium with a lid) or less humid (terrarium without a lid).
Ready, Set, Assemble!
Now that you’ve gathered the necessary supplies, you’re ready to start assembling your terrarium. Thirty minutes is about all the time you need to put things together, and you’ll have a fun new glass garden to enjoy yourself or to show off to your family and friends.
Things You’ll Need
- Terrarium vessel (with or without a lid, depending on your project)
- Stones, marbles, gravel, or coarse decorative sand
- Sphagnum moss
- Plants of your choice
- Terrarium charcoal or aquarium filter charcoal to keep the air fresh
- Potting soil
- Sand (if you’re creating a cacti environment)
- Optional decoration: ornamental miniatures or fairy garden accessories
Assembly
Start by adding stones, marbles or sand to the bottom of the terrarium, then add one thin layer of charcoal. Next, add a thin layer of sphagnum moss, which will keep the soil from settling to the bottom layer of stones and act as a filter, leaving your soil intact. Add a two inch layer of potting soil, or equivalent based on the size of the container. Make small indentations in the soil, add plants and gently press soil around them. Last but not least, add creative finishes such as more rock and terrarium miniatures to fill out space.
Proper care and maintenance of your terrarium is essential. Water by misting lightly every two weeks and don’t place the terrarium in direct sunlight. If you’ve planted a terrarium without a lid, keep an eye on it and water every week if the soil is dry. Bear in mind, some plants may outgrow your terrarium, so clipping may be necessary. Rotate your terrarium occasionally to help ensure that all sides get equal exposure to sunlight.
Share the Love
Are you stressing out over trying to find that perfect gift for someone? Take your new hobby one step further and share the joy of terrarium gardening. Put together a starter kit for that friend who doesn’t have much gardening experience. Package the starter kit with all the supplies necessary to get going, including assembly instructions and a gift card to a local garden center. Place rocks, soil, sphagnum moss and miniatures in labeled baggies and lay inside the planting vessel. Attach instructions and you’ve got a quick, easy gift!
When planted correctly, a terrarium requires little attention but reaps big rewards. Simply mist and place a lid on the container and they become miniature eco-systems as well as great decorating pieces for your home, office or anywhere else. Terrariums are a perfect no-fuss option for any aspiring gardener whose thumb may not be quite so green.
A Party…Pigskin Style – Tips for a Super Bowl Sunday Funday
By Aly Wagonseller
Football! Yeah! If you’re like many Americans obsessed with this bone crunching, sweat spewing game of brawn, you’ve anxiously awaited Super Bowl Sunday for months. Maybe your favorite team has made the cut, or perhaps they’ve vanished from the rankings in a tackling puff of grass stained smoke. Either way, why not plan a pigskin bash your friends will be talking about for many seasons to come?

What’s nice about a Super Bowl party, as opposed to a non-sporting event soirée, is that you’ve got built in entertainment and a theme to hang your helmet on. No need to do much to keep your guests amused; the opposing teams and commercials will do that for you. All you really need are a few creative ideas for decorating the home field, passing out some good eats and making the big event entertaining for football lovers and haters alike.
Stadium Style
Setting the mood for the main event can make even the most lackluster of championship games something to cheer about. Brittney Melnick, founder of local company B With a Twist Catering, has some ideas that encourage everyone to get into the game. “Create two opposing territories in your house by dividing your room into two distinct sides decorated in the colors of each of the two Super Bowl teams,” suggests Melnick. “Encourage guests who don’t have a rooting interest in the game to pick a side and root accordingly,” she adds. Decorating ideas might include balloons, team posters, crepe paper streamers and throw pillows or chair cushions made from color coordinating, inexpensive fabrics.
Brittney also offers some clever ways to make your buffet table the center of attention while keeping things simple yet festive. “Cover your serving table with astro turf and use white satin ribbon at field markers to set the stage for buffet style finger food stations,” she says. “A black-and-white-striped tablecloth is a more subtle way of invoking football. Maybe even wear a referee shirt yourself, complete with whistle!”
Goal Worthy Grub
While you want to have a man-worthy selection of great food for noshing, there’s no need to miss the game while cooking in the kitchen. Brittney recommends getting items ready ahead of time, setting them out and allowing guests to help themselves. “A great way to pull off a menu that allows both you and your guests to enjoy the day is by offering a meatball bar,” she suggests. “Make a variety of flavors that include beef, turkey, even a vegetarian ‘meatball’ with a variety of sauces. Round out the meal with great breads for sandwiching, as well as an array of toppings. Include different cheeses, fresh basil or caramelized onions, or add chutney for a new twist!”
If you’re feeling super spirited, Melnik suggests interjecting some friendly competition into the evening by hosting a chili throw down. “Super Bowl, with its lengthy half time show, is the perfect opportunity to hold a cook-off, and with several people each bringing an entry, it means less cooking for you as the host. At halftime, ask everyone to vote for their favorite chili. At the end, announce the winner and send them home with a prize basket of snacks.”
In between quarters and after the game, make sure there’s a variety of snacks available to keep people from overindulging in the alcohol department. Get creative by shaping dips, cookies and brownies into football related shapes, while having snack mix, popcorn and other easy to eat items spread throughout the room in decorative, team coordinating colored containers. If possible, do as the stadiums do and close down the bar for the fourth quarter, instead offering plenty of water and other hydrating drinks for the road.
A Game of Your Own
Betting on your favorite team always makes things more interesting, and a Super Bowl party just wouldn’t be complete without Super Bowl squares available for purchase. Set the limit for your squares, taking into account the number of people who’ll be betting as well as the booty to be distributed at each juncture of the game. Make things simple by visiting www.docsports.com/current/super-bowl-squares.html for an easy to print grid and instructions on setting up the game if you’re unfamiliar with it.
Brittany suggests taking advantage of the often hilarious commercials played on game day by handing out “rating cards” numbered 1 through 5 to all the guests, then asking them to score each Super Bowl commercial as it airs. Tally up the points so you can announce at the end which commercial is the party favorite.
Finally, add a touch of football mania by offering a face painting station for both adults and kids. Going this extra mile encourages guests to take a stand on which team they’ll root for and also makes for colorful pictures to post on Facebook and Twitter accounts! Websites such as www.snazaroo.us/football.htm offer easy to use stencils that make it easy to paint your game face on.
You don’t have to be the most creative person in the world to host an exciting and successful Super Bowl party. With great ideas from B With a Twist Catering and a little preparation, your Super Bowl Sunday will most definitely be a funday!
Brittney Melnick and B With a Twist Catering specialize in upscale comfort food including unique twists on macaroni & cheese, BBQ meatballs, red wine braised short ribs and mouthwatering homemade desserts. For catering info, call 553-7849 or visit www.bwithatwistcatering.com.


